Introduction
Muscle recovery after a workout is an important factor, and foam rolling is probably one of the best approaches when it comes to this. The act of using an instrument like a cylindrical foam massaged with a textured surface and one that usually applies pressured to the muscles and connective tissues is called self-myofascial release or foam rolling.
With application of specific foam rolling techniques, flexibility, decreased muscle stiffness and development of a strategy to tackle adhesions which in essence, fast track the general fitness performance. In this detailed article, we will detail the most effective foam rolling exercises and how you can apply them to your foam rolling routine.
It is about Coming to Terms with Foam Rolling
To introduce the various foam rolling techniques, it may be useful first to address why foam rolling is beneficial to include as part of post workout recovery. Here are just a few of the reasons why foam rolling is considered an essential recovery tool:
1. Improved flexibility and range of motion: Before discussing the importance of foam rolling, it is important to point out that foam rolling targets muscles fibers and connective tissues hence increasing flexibilities and range of motion.
2. Reduced muscle soreness and stiffness: Massaging certain muscles through foam rolling can help reduce the tightness and the pain that so often accompanies a great workout, thus allowing one to get back on their feet much faster.
3. Enhanced blood circulation: It stimulates blood flow into the muscle, which is good for the blood flow into the muscle to bring the oxygen and other nutrients it needs for muscle repair and growth.
4. Breakup of adhesions and knots: The idea behind foam rolling is to apply pressure to the spot(s) where specific muscles get tight, or trigger points, and muscle knots in muscle tissue so that they become more functional to the muscle fibers.
5. Increased performance: Therefore, including foor rolling in your fitness regime can be a great way to increase you muscle fiber’s excitation contraction coupling capacity, a parameter that will certainly not be a disadvantage when aptetiing yourself in the gym.
Having got a general view of foam rolling routine, it is time to give a closer look at the approaches to foam rolling after a workout.
Technique 1: Basic Foam Rolling
The first technique of foam rolling that everyone should apply is a basic one, and it is as useful as the other ones for muscle recovery. Here’s how to do it:
1. Select the right size of foam roller to use. A 36 inch roller should be suitable for most individuals but if you are tall or short, have long arms or short arms, it is always recommendable to go for a shorter roller or an extended roller respectively.
2. For example, choose to develop your quads, your hamstrings, or your calves.
3. Sit across the foam roller in a way that the muscle group you are working on is on and over the roller. For example, when seeking to work the quadriceps place your legs on the roller, slightly bent at the knee and facing the ceiling.
4. Now begin to start turning it around in circular motion – switching up its direction – but while using the weight of your body to press down on the muscle fibers. Try to roll for about half a minute on each area of tension or discomfort while taking 5–10 seconds of pause to release a particularly tense area.
5. It is recommended to perform this action gradually from the middle of the muscle towards the top and the bottom as well as to make sure you spend the similar amount of time training both portions of the muscle.
6. For the given number of repetitions or till all these muscle groups are targeted, it is done in this manner.
Technique 2: Dynamic Foam Rolling
The opposite of dynamic foam rolling is such foam rolling in a particular muscle group and doing it through a certain range of motion to apply foam rolling pressure on a specific muscle group. This technique can help improve flexibility and muscle activation:
1. Select an area of the body that you want to target, for instance hip flexors, and get on the foam roller putting the target muscle group on the roller, with one leg flexed at the knee and the other stretched outward.
2. Start a rolling movement by pulling the opposite limb with the extended leg back and roll the muscle group on the length of the roller. Always make sure that your stomach muscles are tense, and your movements are smooth and controlled.
3. Lower yourself gradually over the roller, rotating your feet for a few revolutions until you come to halt in the initial position. Dating this process for roughly 10-15 reps, keeping the pressure on the tender Boca Raton business improvement districts regions.
4. As soon as you hit the number of repetitions for a specific movement, change the position and perform the same on the other leg.
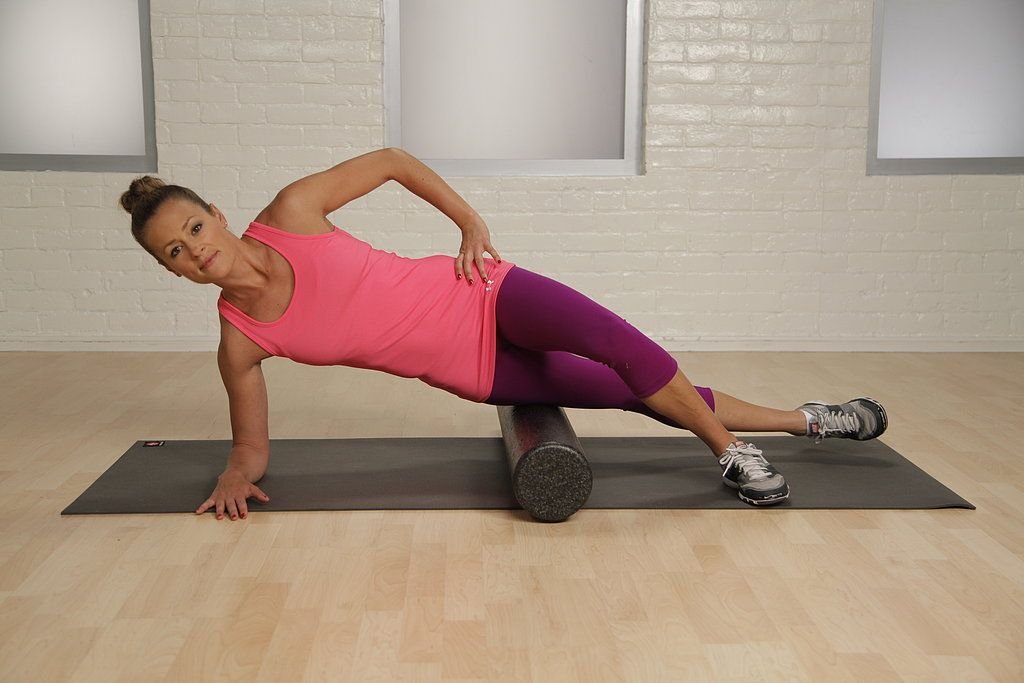
Technique 3: Targeted Foam Rolling
Targeted foam rolling involves pinpointing specific areas of tension and applying consistent pressure to release tightness and improve muscle recovery:
1. Choose a spot that you want to focus on – it can be any singled out muscle area that feels most tense like the backbone area on the upper back, a painful spot in gluteal muscles.
2. Then sit in the same way as the prone position (Place your body weight on the foam roller, so the muscle group or trigger point is on the upper part of the roller).
3. The person should roll back and forth in a slow manner covering the localized spot while putting pressure on the painful sensations. This should be done at the point where the tendon is pressed and the muscle contracted for at least 30 seconds.
4. For the prescribed amount of sets, or until the sore point subsides, continue this exercise.
Technique 4: Static Contract – Relax (SCR) Foam Rolling
Furthemore, there is a static contract-relax (SCR) foam rolling protocol, which is intended to develop muscle length and flexibility as well as to enable a higher level of muscle tightness release. Here’s how to perform it:
1. For example, focus on a single muscle, such as lower back or iliotibial band or IT band.
2. This is normally done by positioning yourself on the foam roller, with the muscle group resting on it.
3. Perform contractions of the particular muscle group for approximately between 5-10 seconds and squeeze it firmly against the roller. This contraction will assist to get ready the muscle for a release.
4. Be gentle to the muscle, ensure that it is stretched but you still have your roller touching it. This stance is meant to relax the muscles that have been contracted by being held sustain this for about 15 seconds somewhere between 30 and 15.
5. Perform the contract-relax cycle approximately for 3-5 cycles or more until the intended release is gained.
Technique 5: PNF Stretching as Applied to Foam Rolling
Proprioceptive neuromuscular facilitation (PNF) stretching combined with foam rolling is a highly effective way to enhance muscle flexibility and recovery:
1. Focus in a specific muscle group, for instance your hamstrings or hip flexor muscles.
2. Lie down on your side with the particularised muscular tissue resting directly on the foam roller, one leg flexed at the knee and the other stretched.
3. Start with the palm touching on the ground where the leg is stretched with at least 5-10 seconds.
4. Reduce the tension in the stretched muscle group and in a smooth motion drag the foam roller up and down the muscle. Exercise awareness in areas of tension and discomfort; hold for a few seconds whenever you feel them.
5. Continue the stretch and roll combination for approximately three to times five, or until the specified degree of flexibility and muscle release is obtained.
Techniques of Foam Rolling depend on the intensity of the pain experienced by the muscle.
Although foam rolling is an effective tool for recovery it is important to keep an eye on the timing of the exercises. Here are some general guidelines for incorporating foam rolling into your routine:
1. After a workout: However, as a rule, if you want to get better results, foam rolling can usually be done after training, as muscle tissues are still warm and flexible.
2. Before stretching: Foam rolling is helpful because you can use it to prepare the muscles for stretching, and you can release those knots and bring the blood flow into an area. Apply foam rolling before exercising by doing the static stretching activities.
3. Once or twice per day: Foam rolling benefits most if it is integrated to your schedule one or two times a day especially if one is an athlete or performing some very vigorous exercises.
Foam rolling precautions
While foam rolling is generally safe for most people, there are some precautions to keep in mind:
1. Consult with a healthcare professional: If you have any underlying medical condition or have a particular injury, it is always recommended to consult your doctor before using CBD oil.
2. Focus on breathing: When foam rolling keep your breathing pattern comfortable because it ease your muscles to relax.
3. Listen to your body: While foam rolling, if you feel some shooting pain or any kind of discomfort then you should stop rolling and seek help.
4. Avoid rolling over joints: Do not flex, or roll over, any parts of your body especially your knees and elbows you might end up getting an injury.
Conclusion
Hence, foam rolling after training exercises should be adopted by anyone who wants to delay the ripping point and improve their general flexibility. The routine foam rolling is always important and in case you haven’t been doing it regularly, mastering the five techniques provided in this guide ensures that you can address and prevent any muscles soreness or tension associated with your training.
Please, it is always important to remind you to use these and any other technique in training if they are necessary in your routine depending with your personal preference or objectives. If you are devoted to foam rolling exercises, you will quickly realize that your body has improved significantly in terms of both speed of recovery and health. Happy rolling!